Full-fledged GWT Rich Text Editor widget
This post has the Part 2 - Add custom events to your GWT widget
There is a plenty of Java Script libraries doing various useful things for you. And it is pretty easy to integrate them into your GWT project, so you obviously want to do so rather than reimplementing the same functionality in Java. But you still want to use as less JSNI code as you can, right? In this article I would like to show how to create new GWT widget by wrapping an existing Java Script library.
It was a need in a nice text editor widget when I created my first one. GWT comes with RixhTextArea which is useful to display rich text, but not that useful to edit a text when you realize that it doesn’t come with the full set of controls to trigger text formatting (like buttons to trigger bolder text, drop-downs with fonts, etc.). So, you will need to implement all these by your own, if you stick to this widget.
On the other hand, there is a well-known TinyMCE JavaScript library that does all the stuff for you. Well, in fact I think this is the reason why there is no pure GWT widgets with its functionality - why create one from scratch if we can reuse TinyMCE? So, that’s what we will do here - we will create a TextEditor GWT widget reusing the functionality from TinyMCE. You can visit the page by link above and have a look on how it looks like, if you are not familiar with this library.
Widget interface
To get the idea on what it will be like, and what is a benefit of the separate widget, have a look at some sample code. The obvious benefit is no injection of any Java Script code to a host page. This is pure Java:
final TextEditor editor = new TextEditor();
editor.setWidth("700px");
editor.setHeight("400px");
editor.addOptions(TextEditorPreset.PRESET_ADVANCED);
editor.addPlugin("contextmenu");
editor.setText("Hello, <b>World</b>!");
editPanel.add(editor);
That’s it! Nothing else. Once we have a widget implemented, we will be able to:
- Add a text editor to a GWT application as a regular widget. No JSNI code at all, no changes to host HTML.
- Use all the same functionality as for regular TextArea
- Configure TextEditor with any options: select the controls to use, enable TinyMCE plugins (like spell checker, context menu, etc.).
- Use “presets” to initialize the widget with a predefined set of options
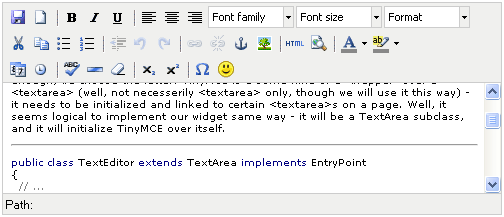
And this is how the widget looks like:
Create a project
Hereafter we will go through a widget implementation process, but I won’t be much concentrating on the usual developments stuff, rather I will describe the general ideas behind the implementation. We also assume here that you have a GWT project for the widget. My project is named “TextEditor”. To start with, our TextEditor.gwt.xml looks like:
<module>
    <inherits name="com.google.gwt.user.User"/>
    <entry-point class="your.package.texteditor.client.TextEditor"/>
</module>
I’d also recommend to create another one project where you will use the widget while implementing it. Create a panel with a widget, and launch this project in hosted mode from time to time to see what we have.
TextEditor widget base
Firstly, we need to identify the widget superclass. We have options to create a Composite, or a new widget from scratch, or extend an existing one. Obviously enough, we choose the latter: TinyMCE is a some kind of a “wrapper” over a <textarea> (well, not necesserily <textarea> only, though we will use it this way) - it needs to be initialized and linked to certain <textarea>s on a page. Well, it seems logical to implement our widget same way - it will be a TextArea subclass, and it will initialize TinyMCE over itself.
public class TextEditor extends TextArea implements EntryPoint
{
  // ...

  public void onModuleLoad()
  {
  }
}
As you notice, we also implement EntryPoint. In fact we do nothing in the onModuleLoad() implementation, but it’s still necessary if we want to compile the widget.
Well, pretty good for now - our widget already has the standard interface and an implementation for such methods as setHeight(), setText(), etc. Pretty cool, but… oh, our widget does nothing new yet… Well, here goes…
Wrap the JavaScript library
Add the library to “public”
Let’s add the text editor functionality now. To do so, download a TinyMCE library, extract it and add it to a new “public” package. Yes, that’s the point - any necessary JavaScript libraries will reside in the project’s public directory, and thus will be available with the widget itself. This means that you will not need to add the library to the \web directory if you are willing to use the widget. Sure enough, you should also add the new public directory to TextEditor.gwt.xml:
<module>
    <inherits name="com.google.gwt.user.User"/>
    <entry-point class="your.package.texteditor.client.TextEditor"/>
    <public path="public"/>
</module>
While the directory structure may look like:
your\package\texteditor\TextEditor.gwt.xml
your\package\texteditor\client
your\package\texteditor\client\TextEditor.java
your\package\texteditor\public
your\package\texteditor\public\tiny_mce\
your\package\texteditor\public\tiny_mce\tiny_mce.js
etc. (the rest of the library)
Load the JavaScript to the host page
Well, as we added the library to the public directory for our project, sure enough we won’t be willing to modify the host page to load it. Remember? Our idea is - not any manipulation on a host page. So, thus we load the library in the TextEditor.gwt.xml as well
<module>
    <inherits name="com.google.gwt.user.User"/>
    <entry-point class="your.package.texteditor.client.TextEditor"/>
    <public path="public"/>
    <script src="tiny_mce/tiny_mce.js"/>
</module>
Initialize the JavaScript library
O.K. Now we have a library included with the widget itself, it will be loaded to the host page, but it still has to be initialized. And so, we override the onLoad() method of the widget. It will launch a JSNI method in turn:
public class TextEditor extends TextArea implements EntryPoint
{
  private static final String DEFAULT_ELEMENT_ID = "textEditor";

  private boolean initialized = false;
  private String elementId;
  public TextEditor()
  {
    this(DEFAULT_ELEMENT_ID);
  }

  public TextEditor(String elementId)
  {
    this.elementId = elementId;
    getElement().setId(elementId);
  }

  protected void onLoad()
  {
    super.onLoad();
    initialize();
  }

  private void initialize()
  {
    initTinyMce();
    initialized = true;
  }

  private native void initTinyMce()
  /*-{
    var options = {
      mode: "exact",
      elements: this.@your.package.texteditor.client.TextEditor::elementId,
      theme: "simple"
    }
    $wnd.tinyMCE.init(options);
  }-*/;
}
As you can see, we tell TinyMCE to work with “exact” textarea we specify, which is the one created by the widget itself. To be able to tell which one it is, we set the id to the textarea element in the constructor, and specify it to TinyMCE in the initTinyMce method.
You maybe noticed the initialized boolean variable - don’t bother much now, we will see what it is for in a moment. If you have a project to test the widget - try launching it now - do you like the idea so far? :) But, oops… If you try using getText() or setText() now - you will realize it is not working. This is because of some TinyMCE specifics I won’t concentrate on here. Let’s add this:
public String getText()
{
  String result;
  if (initialized) {
    result = getContent(elementId);
  } else {
    result = super.getText();
  }
  return result;
}

private native String getContent(String elementId)
/*-{
   return $wnd.tinyMCE.get(elementId).getContent();
}-*/;


public void setText(String text)
{
  if (initialized) {
    setContent(elementId, text);
  } else {
    super.setText(text);
  }
}


private native String setContent(String elementId, String text)
/*-{
   $wnd.tinyMCE.get(elementId).setContent(text);
}-*/;
Now you see why we added an “initialized” boolean variable also. This is just to prevent us from trying to get content via tinyMCE API while the tinyMCE is not yet initialized. For example, it will be omitted when you invoke the setText(String) method before the widget is loaded onto a page.
Congratulations! You now have a working widget! If you try to launch sample application using this widget, you will be able to edit text and get the text in you sample application. Cool!
Polishing up - configure initialization options
Well, so far looks good, but still, our widget lacks any ability to configure it. You can not add controls, TinyMCE plugins, etc. So, lets add this ability. Again, let’s see how TinyMCE works - we define the set of initialization options, invoke tinyMCE.init() passing it in, and so it initializes as specified.OK, so this means we need a way to manage these options. Previously they were hard-coded in the initTinyMce method, now they’ll be configurable and will be built at the tine the initialization is invoked. Let’s add the following:
private Set fixedOptions = new HashSet(2); // options that can not be overwritten
private JSONObject options = new JSONObject(); // all other TinyMCE options

public TextEditor(String elementId)
{
  this.elementId = elementId;
  getElement().setId(elementId);

  // fixed attributes
  addOption("mode", "exact");
  addOption("elements", elementId);
  fixedOptions.addAll(options.keySet());
  // load preset
  addOptions(TextEditorPreset.PRESET_BASIC);
}

public void addOption(String key, String value)
{
  // do not allow overriding fixed options
  if (fixedOptions.contains(key)) {
    return;
  }

  options.put(key, new JSONString(value));
}

private void initialize()
{
  initTinyMce(options.getJavaScriptObject());
  initialized = true;
}

private native void initTinyMce(JavaScriptObject options)
/*-{
  $wnd.tinyMCE.init(options);
}-*/;
Even though may look logical, we don’t store options in a Map. The better for us is to store options in a JSONObject because later it will much easier to convert them to a options array accepted by tinyMCE.init() method. We also add several convenient methods to add new options. But we still don’t want widget users overriding some of them - in particular these are the options related to how the TinyMCE finds the textares to link to. For this purpose we add a so-called fixedOptions set and check that users don’t override them.
Pretty cool, yeah? Notice that we added pretty rich functionality with minimal JSNI tricks now. That’s it. Oh, almost forgot - do inherit from the com.google.gwt.json.JSON in your TextEditor.gwt.xml, as we use the JSONObject.
Polishing up - add configuration presets
Great, we may configure our widget. But, the configuration process may be pretty tricky if you need to add about a dozen of options. Well, you noticed we have a convenient method to add a bunch of options from a Map - addOptions(). So, you may easily store your favorite presets in a static Map and reuse it whenever needed. Hmm.. Why not adding some of the preset to the widget itself? Let’s do - we create a new class:
public class TextEditorPreset
{
  public static Map PRESET_ADVANCED = new HashMap();
  public static Map PRESET_BASIC = new HashMap();

  static {
    PRESET_BASIC.put("theme", "simple");

    PRESET_ADVANCED.put("theme", "advanced");
    PRESET_ADVANCED.put("plugins",
      "emotions,spellchecker,advhr,insertdatetime,preview");
    PRESET_ADVANCED.put("theme_advanced_buttons1", "newdocument, |,
      bold, italic, underline, |, justifyleft, justifycenter,
      justifyright, fontselect, fontsizeselect, formatselect");
    PRESET_ADVANCED.put("theme_advanced_buttons2", "cut, copy, paste, |,
      bullist, numlist, |, outdent, indent, |, undo, redo, |,
      link, unlink, anchor, image, |, code, preview, |, forecolor, backcolor");
    PRESET_ADVANCED.put("theme_advanced_buttons3", "insertdate, inserttime,
      |, spellchecker, advhr, ,removeformat, |,
      sub, sup, |, charmap, emotions");
    PRESET_ADVANCED.put("theme_advanced_toolbar_location", "top");
    PRESET_ADVANCED.put("theme_advanced_toolbar_align", "left");
    PRESET_ADVANCED.put("theme_advanced_statusbar_location", "bottom");
  }


  private TextEditorPreset() {}
}
This is just an example. You may add any other options you like. You can find a detailed description of all supported options on the TinyMCE web site.
Finally, let’s suite our widget with another one method to load a perset in. In fact, it is the same as addOptions(), but just looks more natural:
public void applyPreset(Map preset)
{
  addOptions(preset);
}
Final notes
That’s it. There is still lot to do with the widget, however. There are many ways to enhance it. Each next little step makes your widget even more flexible.
As a proof of concept, this article was entirely written in the primitive WYSIWYG HTML editor created with the very same widget described here. True. Well, with some enhancements actually. If you are interested - in next post I show the complete widget source code, how to manage custom plugins, how to manage save events, and many more.